Bicycles
|
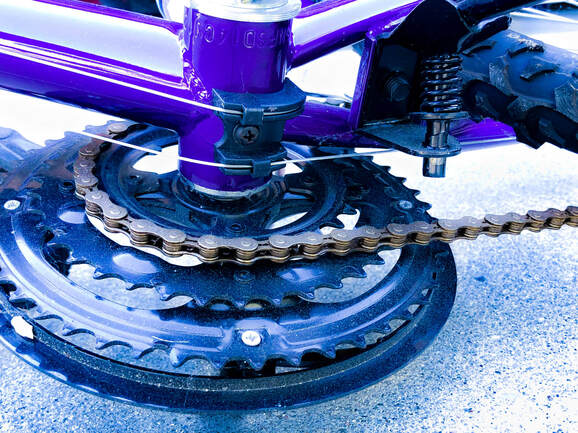
For this image, I placed the bicycle on it's side with the wheels tilted upwards. I chose this photo due to the pleasing left alignment and close up of detailed and intricate gears. When editing the image, I went for a brighter and crisper look from the original. I bumped up the contrast, vibrance, and saturation heavily, bringing out purple undertones. I then recoloured the insides of the bike chains yellow to add greater contrast, and burned the surrounding shadow areas to pop out the bike from the background. Along with this, I added a purple hue to the bike with the hue shift and global chroma tools.
|
|
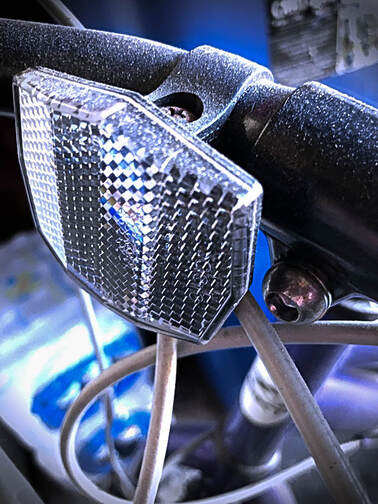
When shooting this image, I was attracted to the interesting usage of shallow depth of field. As attention is taken away from the detailed light, the bike bars fade off into the background. I achieved this effect through placing my camera close to the bike head with a zoomed out view. When editing this image I increased the contrast and detail by a large amount. multiple times I brushed over certain areas like the handlebars and light while increasing texture, detail, and clarity to make the dust more visible. Along with this I slightly vignette and darkened the background using the burn brush tool to allow the bike higher background contrast. |
|
Image Editing
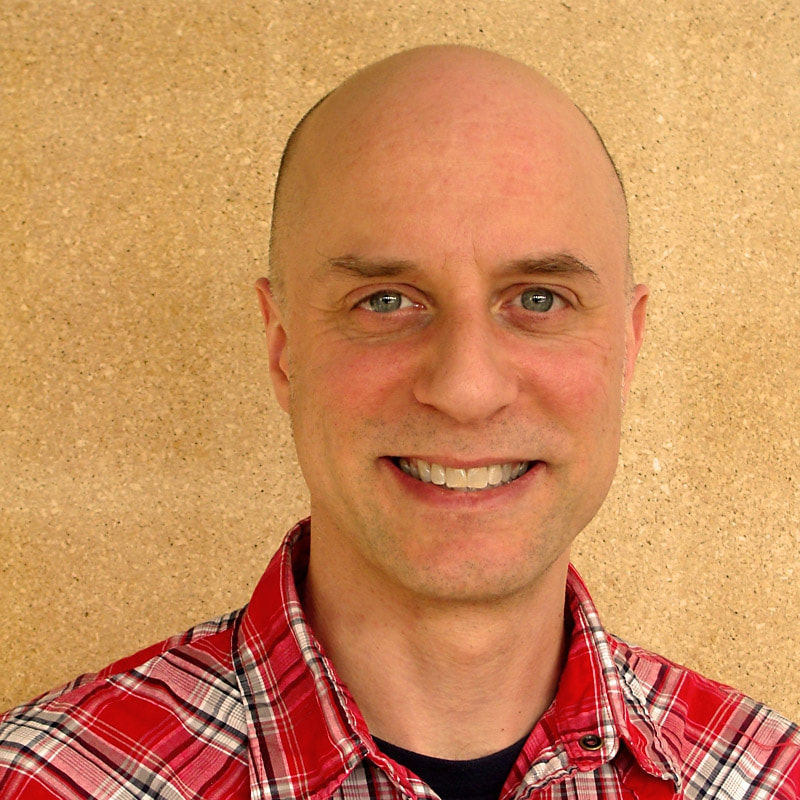
Using lightroom classic, this image has become much more professional looking. The white balance has been picked from the grey inside his eyes with slight temperature modification to discard the yellow undertones of the original. Next, slight whitening was done on his teeth using the brush tool to perfect his large smile. Red hues were then desaturated from the image to give him less of a bright red overly coloured face. The remaining clothing was then added back using a combination of warm temperature and the colouring option under the brush tool. Finally, skin smoothing was lightly applied using the clarity affect, while pupils of the eyes were darkened slightly using the burn brush tool.
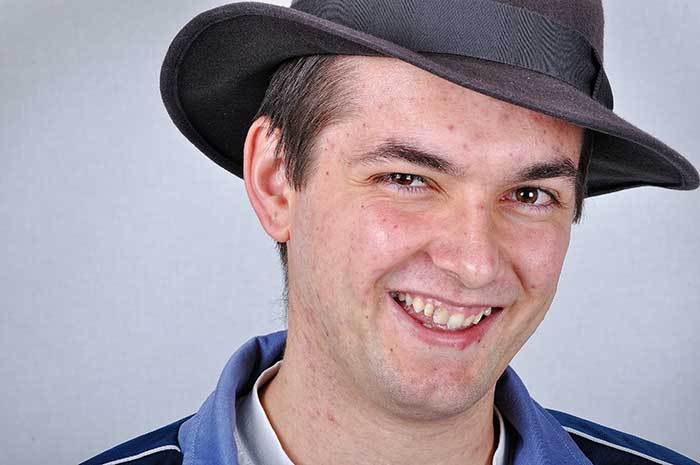

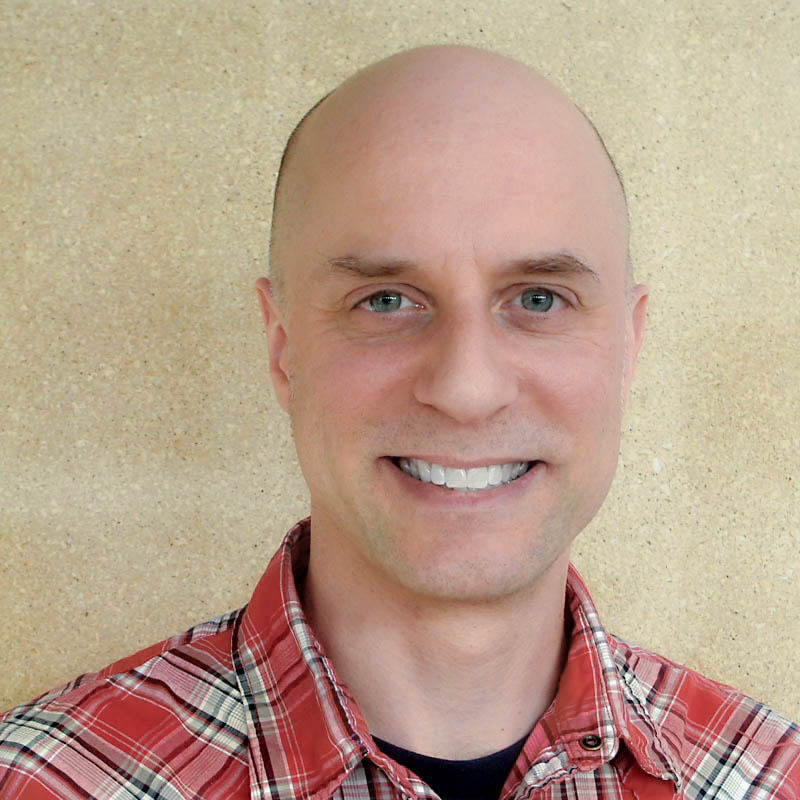
When first tackling images my normal move is too extract and find the correct lighting and white balance. To my surprise though, this image was already quite pleasing to the eye. So instead, I first jumped straight to the spot clone and heal tool to remove a majority of this man's acne. I would first clone the surrounding clean areas on top of the acne stricken ones, then heal them to naturally blend the skin together without looking jagged or unnatural. After this, I cleaned and desaturated his teeth using the teeth whitener under the brush button. Finally, I noticed a small bit of hair poking out messily along the back of his head, so I used the clone tool to find cover up the area with the colour of the background not far away.
Patterns
|
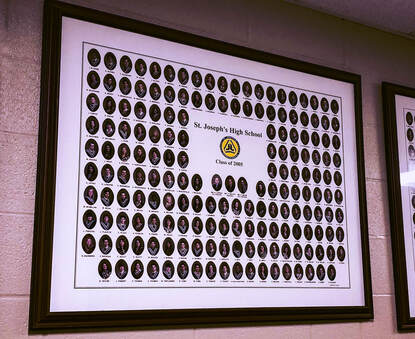
The unique angle and interesting pattern is what drew me to edit and choose this photo first above others. While still a pattern, small structured photos inside one larger photo are not usually be the first thing I would notice as a "pattern". Due to this, I was excited to notice patterns in sometime I had never noticed pattern in before. To make the image more interesting, I first increased the contrast and detail within the image. This allowed for the faces of the graduates to become slightly more clear from the background. As well as this, I used the clone and heal tool to remove unnecessary small details such as bumps on the bottom of the picture frame. To add the final bit of colour to the mostly monotone original photo, I added colour grading of bluish-purple highlights contrasted with yellow-orange shadows.
|
|
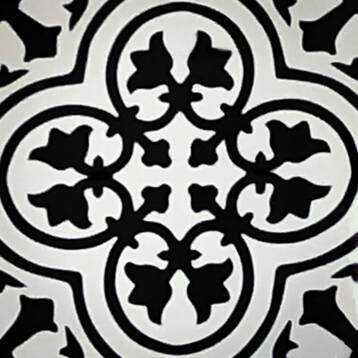
This pattern was taken from the boarding of a school poster wall. I was interested in the detail of the paper, so I took a close-up photo of one set of the pattern sets. Before editing, there was a large staple inside the paper to keep it in place. Using the cloning tool, the staple could be removed by finding other dark and light areas of the image. Also, the image had an unnatural light coming from the right side. To fix this I used the burn brush tool to darken photo areas and eliminate all light sources. Despite the pattern, the image still lacked depth and interesting points though. So to make it more appealing, I added a very opaque vignette around the borders of the image, while adding an opaque highlight to draw viewers' eyes to the center. This along with bumping up the contrast and turning down the saturation resulted in a crisper and more professional-looking image.
|
|
Autumn
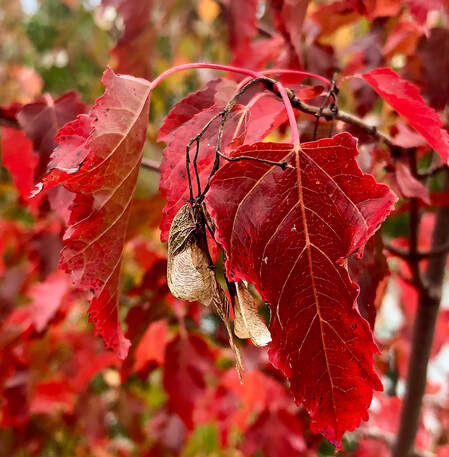
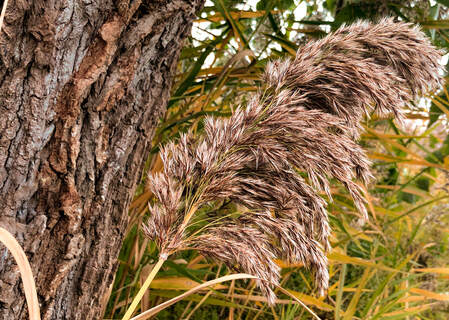
For this shooting assignment, I went to Blue Heron to capture some of the autumn colours and things that reminded me of fall. These pretty red leaves caught my eye though, as they were one of the only coloured plants at the time. Overall, I took many shots of this tree, but chose this one due to the vivid fall colours and shallow depth of field. To achieve this clear front and blurred background, I placed my camera close and slightly underneath the subject, with the focus on the large leave in the front. I did not edit this photo much, only increasing the texture, cropping and slightly warming the temperature for a redder and orange-hued fall-themed image.
|
This picture was captured later in the afternoon when the sky was blue and the wind was blowing. The original reason I was compelled to edit it was due to the eye-pleasing composition. This image holds a steady balance, with the sturdy and left-leaning tree guiding you to the focus plant of the image. Though to increase the subject's visibility even more, I used the brush tool to soften the texture on the tree and intensify the texture and clarity of the plant. As well as this, I slightly increased the contrast and warmed the temperature of the image to help obtain a more vivid and warm autumn yellow colour. Finally, I used the brush tool to slightly soften and darken the background, making the main plant pop against the image.
|
Giving Thanks
|
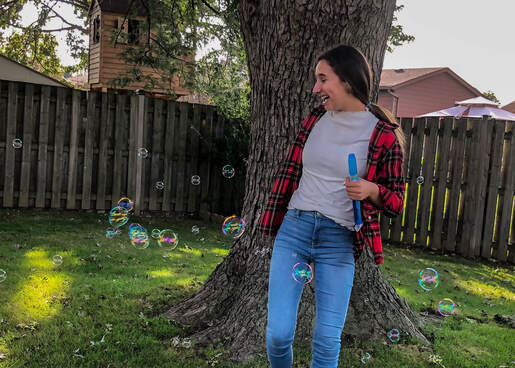
The images I captured for this assignment all took place at my family's annual Thanksgiving dinner. Here, many games and activities were set up to play as dinner was being prepared. This photo was naturally (non-posed) taken as my cousin waved the bubble wand around, and I was drawn to choose it due to her natural pose and joyful face. To edit this photo, I did not need to adjust the white balance as it was already quite pleasant. Instead, I brought down the highlights and slightly lightened the shadows to get rid of any distracting sky lighting. I also slightly whitened her teeth using the brush tool and cropped the photo so her expression could be read with more clarity. Finally, I slightly desaturated the grass and leaves in the background using the brush tool, to keep the viewer's eye focused on the main subject.
|
|
To create this image, I asked permission of my grandpa and cousin, Hannah. To me, this photo symbolizes the coming of young and old together for celebration. The difference in hands shows a difference in person, with the leaves representing thanksgiving and the candles all we are thankful for. When editing this photo, I first darkened the highlights and lightened the shadows. Then, I increased the vibrance to accentuate the warm fall-like mid-tones of the image. My grandpa's hands are naturally ageing, but with the texture tool, I emphasized his wrinkles. Finally, a soft vignette was placed around the candle, and its insides were brightened using the temperature brush. This was done to accentuate the light and create a clear focal point.
|

|
Shoes
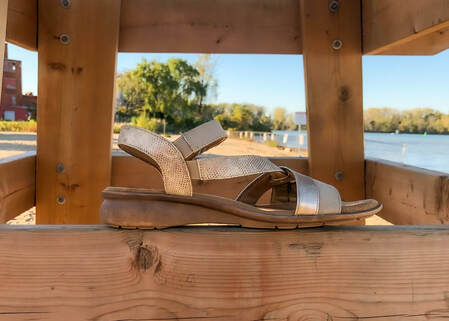
For this assignment I wanted to follow a beach and tropical getaway theme, so I used sandals and located all of my photos at Sandpoint beach on a sunny day. This photo in particular was taken on the side of a lifeguard chair. It personally drew me into editing due to the centered composition and the framing the wood provides for the object of focus, the shoe. To edit this image, I first slightly changed the temperature and white balance giving a warmer summery feel. Next, I cropped the picture so there were fewer distractions such as the heavily textured sand in the background. Finally, I slightly decreased the highlights and whites while lightening the shadows and blacks. As a result, the image looks gentle and summery, portraying my upcoming advertisement theme of summer through shoes.
|

Like the other image, I enjoyed the structure and contrast the lifeguard chair gives the shoes. But unlike the other picture, this image was only ever edited slightly. First, I cropped the picture to focus and center align the shoes. I made this choice due to most ads having a clear and concise point of focus, meaning the shoes should be what grabs the viewer's attention first. As well as this, I slightly coloured in the bottom left corner to match the ground view wood. Originally, It had a bright white highlight which distracted from the point of focus. To fix this, I used the brush tool and painted over a mixture of blue hue with a darker exposure to match and the colours properly.
|
Halloween

Unlike the other images on this website, the process of editing this was highly experimental. When shooting this image my father did not have a weapon, so a hedge trimmer was used. This resolution worked surprisingly well as a makeshift chainsaw.
When editing, I tried to achieve an ominous feel. I first auto-set the white balance with the eyedropper tool and slightly increased the exposure. Highlights and shadows were also darkened, giving the overall image and allowing an atmosphere as if it were taken at night. This intentional change was done due to most horror movies having night settings. Next, I used the brush tool on darken mode to colour the background black. Small areas of light from cars and nearby houses couldn't be darkened enough by the brush, so the remaining background was darkened under spot clone removals. Then, the HSL colour tool was used to accentuate the blood on his shirt. Changing all reds to the lowest luminance possible, I created the illusion that the blood was dried and darkened from being stained to his shirt. All of the orange in the original image was then changed into a red hue using this tool. Finally, for the finishing touch, a large increase of dehazing and vibrancy was applied to my father under the presence section of the basic tools. With this his appearance turned gritty and jarring in contrast to the black background, installing a sense of fear in the viewer.
When editing, I tried to achieve an ominous feel. I first auto-set the white balance with the eyedropper tool and slightly increased the exposure. Highlights and shadows were also darkened, giving the overall image and allowing an atmosphere as if it were taken at night. This intentional change was done due to most horror movies having night settings. Next, I used the brush tool on darken mode to colour the background black. Small areas of light from cars and nearby houses couldn't be darkened enough by the brush, so the remaining background was darkened under spot clone removals. Then, the HSL colour tool was used to accentuate the blood on his shirt. Changing all reds to the lowest luminance possible, I created the illusion that the blood was dried and darkened from being stained to his shirt. All of the orange in the original image was then changed into a red hue using this tool. Finally, for the finishing touch, a large increase of dehazing and vibrancy was applied to my father under the presence section of the basic tools. With this his appearance turned gritty and jarring in contrast to the black background, installing a sense of fear in the viewer.

This picture was taken on Halloween night at my house. Throughout our yard we had set up small fake glowing pumpkins to hang on the bushes, giving an appearance of floating in the dark. I saw this as an inspiration due to the creepily illuminated bush background the glowing pumpkin provided. To make the image more crisp-looking, I first greatly decreased the whites in the image. This was to get rid of the plastic highlights that made the pumpkin look artificial and fake. The pumpkin became a more solid orange as a result, with the plastic creases fading slightly into the light. The next step was to play with the hue shifts under the HSL colour. I slightly moved the red, orange, and yellow hues towards their warmer counterparts. This allowed for the reds to darken, acting as a border and gradient towards the orange middle of the pumpkin. Then, I slightly decreased the clarity of the original image under the presence section. Doing this allowed for the image to blur slightly, blending the plastic and darkening the background to give a cleaner and more pronounced view of the main subject, the pumpkin. Finally, I cropped the image with a 5 x 7 view, centering the pumpkin both horizontally and vertically.
